Last updated on May 22nd,>>>

Solid State Drives (SSDs) offer a significant speed boost over traditional hard drives. But to maintain this performance and extend the lifespan of your SSD, a crucial feature called TRIM needs to be enabled.
TRIM allows Windows to tell the SSD which data blocks are no longer used and can be wiped internally. This prevents the drive from slowing down over time as it fills up.
But how do you know if TRIM is enabled on your Windows system? Don’t worry, it’s easier than you think! This guide will walk you through the simple steps to verify the TRIM status.
Page Contents
What is TRIM
What is TRIM and why is it Important for your SSD?
Unlike traditional Hard Disk Drives (HDDs), SSDs store data in flash memory blocks. When you delete a file in Windows, the operating system typically marks that space as “available” without erasing the data immediately.
For an HDD, this isn’t a major issue as it can directly overwrite that space.
However, SSDs work differently. To write new data to a previously used block, an SSD first needs to erase the entire block.
This erase-before-write process can slow down write performance over time as the drive fills up with “deleted” but not yet erased data.
This is where TRIM comes in. TRIM is a command that allows the Windows operating system to inform the SSD which data blocks are no longer in use and can be wiped internally.
This helps to:
1:: Maintain Write Performance: By pre-erasing unused blocks, the SSD doesn’t have to do it on the fly when new data comes in, leading to faster write speeds.
2:: Extend SSD Lifespan: It reduces unnecessary write operations, which can contribute to the wear and tear of flash memory cells.
3:: Improve Overall Efficiency: Keeps your SSD running smoothly and efficiently.
By default, modern versions of Windows (Windows 7 and up) should automatically enable TRIM for detected SSDs.
However, it’s always a good idea to verify, especially if you’ve manually installed your OS, cloned a drive, or are experiencing unexpected slowdowns.
In case you missed: Should We Or Should We Not Defrag SSD Drive
Which Operating System supports TRIM
Windows XP Do not support TRIM. Windows 7 and above support and are set to automatically enable TRIM on solid-state drives. You don’t need to worry about enabling TRIM yourself.
We are not supposed to worry about enabling TRIM. But, what if it was not enabled? and you want to double-check that Windows has enabled TRIM, you can check.
In case you missed: How To Dramatically Speed Up Windows 10 Boot up Time
How To Check If TRIM is Enabled for Your SSD

You can check this from an Administrator Command Prompt window.
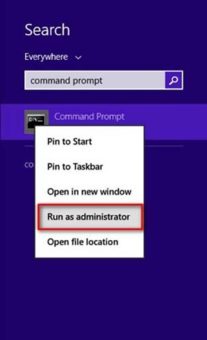
To open a Command Prompt window on Windows 8.1 or 10, type “Command Prompt” or cmd in the search field.
From the result, right-click and select “Run as Administrator”. On Windows 7, open the Start menu, search for “Command Prompt”, right-click the “Command Prompt” shortcut, and select “Run as Administrator.”
Type the following command in the Command prompt window and press Enter. (You can copy-paste the following command)
fsutil behavior query DisableDeleteNotify
Once you press Enter, Windows will show either one of these two results.

If you see DisableDeleteNotify = 0 ,TRIM is enabled. Everything is good and you have nothing to worry.
If you see DisableDeleteNotify = 1 , TRIM is disabled. This could be a problem if you have an SSD.
How To Enable TRIM for Your SSD
Windows by default automatically enables TRIM if you have Windows 7,8.1, or 10,11 and with a modern solid-state drive.
If for any reason TRIM is disabled, which you will know from the above command. It is possible that Windows, for some reason, did not enable the TRIM function.
Possible reasons could be: it’s a very old solid-state drive. But it is also possible that TRIM should have been enabled, but something messed up in the automatic detection process by the Operating system.
So if TRIM isn’t enabled and you’d like to enable it (which you should do). You can do so by running the following command in an Administrator Command Prompt window:
fsutil behavior set DisableDeleteNotify 0

If your Operating system supports TRIM and you have a modern SSD, Windows will enable TRIM and you will get the result as above.
Now, if you use the same command
fsutil behavior query DisableDeleteNotify (as shown in the above image)
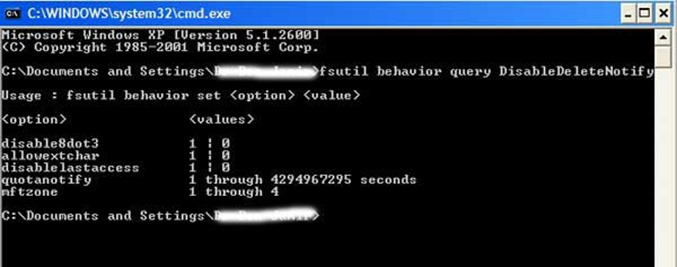
Windows XP
If you use the same command in Windows XP command prompt, you will get the following message. 
This is because Windows XP does not support the TRIM function.
Conclusion :
Ensuring TRIM is enabled is a simple yet crucial step in maintaining the health and performance of your SSD. By following the quick commands outlined above, you can easily verify its status in Windows.
Keeping TRIM active helps your SSD perform at its best and last longer, giving you a smoother and faster computing experience.

Hello! I am Ben Jamir, Founder, and Author of this blog Tipsnfreeware. I blog about computer tips & tricks, share tested free Software’s, Networking, WordPress tips, SEO tips. If you like my post /Tips then please like and share it with your friends.


