Last updated on May 10th,>>>
A good way to organize larger Word documents is by making a table of contents.You can easily create table of contents in word by adding headings and sub-headings to your document.
Having a table of contents (ToC) in your Word document makes it easier for the reader to navigate. The table of contents in a word document also acts as hyperlinks. CTRL+Left click with the mouse will open the link, like any E-document.
Table of contents in Microsoft word, give printed documents a sophisticated look and feel and add eBook-like navigation to on-screen documents.
In this post, I will show you how to do it in MS word, instantly.
See also: How to Restrict Editing in Microsoft Word Document
Page Contents
Designing a Table of Contents in Word
It doesn’t matter what is the size of your document, it could be 10 pages or even 100 pages. A table of contents can direct the reader to exactly where they want to be, or which part of the article they want to read, making the document more reader-friendly.
It also makes it easier for the author to go back and add or remove content if necessary.
By default, Microsoft Word generates a table of contents using the first three built-in heading styles (Heading 1, Heading 2, Title and Sub-Title).
Create a Table of contents in Word
To make a table of contents in Word, you’ll need a document with sufficient text.If your document is large enough, however, you can make a table of contents in Microsoft Word using heading styles.
MS Word will create a table of contents from the document text you styled with one of the first three heading styles: Heading 1, Heading 2, and Heading 3, etc.
These options you will find under the home tab in the ribbon menu, as shown in the image below.
In your document, you can have Headings, Sub-headings, contents etc.
<Heading>
<Sub-heading>
<Contents>
In the document select your main heading(s) and click on the “Heading 1”. This will automatically change the heading to blue color and font size to 14 blue and bold.
You can change the font size if you want to. Select all your other main headings and click on Heading 1.
Next Select all your Sub-headings in the document and click on “Heading 2” on the menu. Remember you can have as many sub-headings under one heading.
So when the table of content is inserted all the sub-headings will come under that particular main heading.
You can change the heading and sub-headings later also, all you have to do is to update the TOC.
Once you’ve selected the headings and sub-headings in your document.
Inserting a Table of Contents in Word
It’s time to insert your Table of contents. The next thing you need to do is put the cursor where you want the table of contents to appear. Preferably just before the first heading.
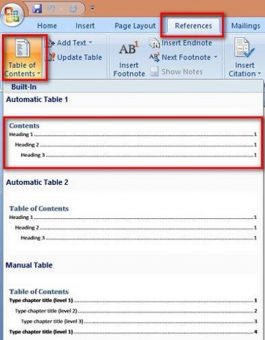
Now, head over to the “References” tab and select “Table of Contents.” on the extreme left of the ribbon menu. See image below
Once you click a drop-down menu will appear. Here you can choose from three different built-in ToC.
There is hardly any difference between Automatic 1 and Automatic 2, except the ToC headings “Contents” and “Table of Contents” which word will insert on top of the created table of contents.
If you chose the “Manual Table” option from the drop-down menu, then it will insert a template for you that you will need to edit yourself. You will be required to manually re-arrange chapter wise.
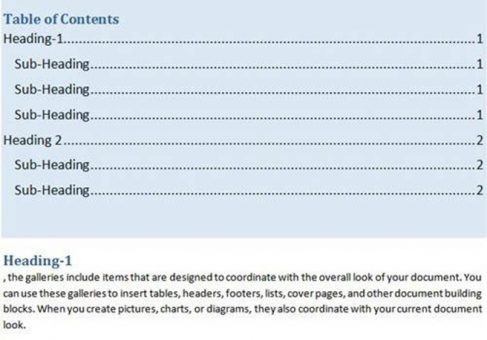
 Using the Automatic option for ToC in MS Word will create the ToC as per your headings and sub-headings, which you have already set. (as described above).
This is far easier to create a table of contents in MS word.
See also How to password protect word and excel documents.
Click on either Automatic 1 or Automatic 2, word will insert the Table of content exactly at the position where you inserted your cursor in the document.
Additionally, if you want the table of content on a separate page, place your cursor just below the ToC and click on Insert > page break.
Updating the Table of Contents
If you want to add or remove a section/sub-heading from your document, you can easily update the table of contents to reflect those changes.
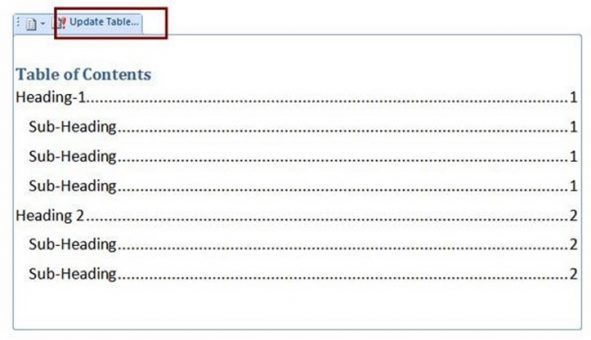
To update your ToC after making the changes, just select it, an option box will appear in the top, click “Update Table”. You can choose whether you want to update only the page numbers or the entire table. Click “OK” to apply the changes.
The table of content will be updated.
Removing Table of contents
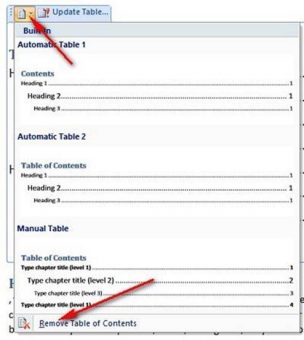
If you want to remove all you need to do is select the ToC and then click the arrow on the menu that appears, at the bottom of the drop-down menu, select “Remove Table of Contents.”

Hello! I am Ben Jamir, Founder, and Author of this blog Tipsnfreeware. I blog about computer tips & tricks, share tested free Software’s, Networking, WordPress tips, SEO tips. If you like my post /Tips then please like and share it with your friends.


