Last updated on August 3rd,>>>

Do you have a collection of HD movie videos with unsupported audio format? You plug in the USB drive with an HD movie file in your TV, the movie plays fine but you get no audio or get the message “Audio not supported”
This article will show you how to extract audio from HD movie file and do multiplexing and watch your HD movies with unsupported audio format.
Page Contents
Why is Audio not supported by TV?
First, let us understand why the audio format is not supported on televisions. Even new brands of TV do not support videos with audio codecs like AC3 or DTS etc.
The reason is, the audio codecs that you are trying to play are having patents. And a commercial license is required in order to decode them.
So is it mandatory to purchase those codecs? No! and you can easily convert those audio codecs to the one that your TV supports with freely available tools.
It is simple and fast since we are not going to modify the video.
Play HD Videos With Unsupported Audio Format
In this tutorial will use two tools Pazera Audio Extractor & MKV Toolnix to solve Unsupported Audio Format on Television. The best part about these tools is they are open source, so FREE.
1: Pazera Audio extractor
2: MKVToolNix
How to use Pazera Audio Extractor?
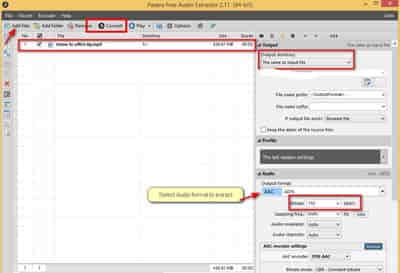
Pazera Free Audio Extractor is a universal audio converter. The program allows extraction of audio tracks from audio and video files without loss of sound quality or conversion to MP3, AAC, AC3, E-AC3, Ogg-Opus, Ogg-Vorbis, WMA, FLAC, M4A-AAC, M4A-ALAC, WV (WavPack), MKA-Opus, CAF-Opus, AIFF or WAV.
The program has a number of predefined settings (profiles) specially designed for novice users. The Pazera Free Audio Extractor interface is very simple and user-friendly.
 Click on the image for a larger size
:: Download and install the Pazera Audio Extractor tool.
:: Open the video file in which you want to extract audio by clicking Add Files button or simply drag and drop the file.
:: Select the output format like AAC – ADTS.
:: Choose the Output directory. This is the location where your extracted audio will be saved.
:: If the audio quality is poor, increase audio bitrate.
:: The most important audio conversion parameter is audio bitrate. Generally, the higher bitrate, the better sound quality in the output file. But on the other hand, the higher bitrate, the larger the output file.
:: It is best to set the audio bitrate in the Auto position, then the program will select the appropriate value automatically.
:: Finally, click on the convert button. Pazera Audio extractor now extracts the audio from a video file and stores the audio in your selected output format.
How to use Mkvtoolnix?
 Click on the image for a larger size
MKVToolNix is a small collection of tools (mkvmerge, mkvinfo, mkvextract, mkvpropedit and mmg) that allows you to manipulate Matroska (MKV) files in several ways.
You can use MKVToolNix to create, split, edit, mux, demux, merge, extract or inspect Matroska files.
Well! without going into further details of this amazing free tool, let’s see how to use it. First, download and install MKVToolNix software.
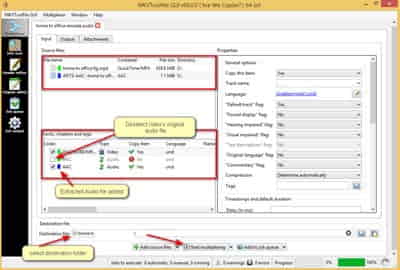
:: Open the MKV ToolNix software and load the video file by clicking Add source files or drag and drop video.
:: Once the video file has been loaded into MKV ToolNix, it displays the Tracks, chapters, and audio for that file.
:: Now, load the extracted audio format into MKV ToolNix which we extracted with Pazera Audio Extractor.
:: MKV ToolNix software now shows three or more files (Video file + Default Audio Output + Extracted Audio Output).
:: Deselect or uncheck the default Audio Output format and leave the other things unchanged.
:: Now, choose the destination file name and location of the new file.
:: Finally, click on “Start multiplexing”.
You’ll see a pinwheel in the lower right corner of the MKVToolNix window start to spin, and a progress bar as this tool does the job.
It may take a few seconds to minutes depending on the size of the video file. In the end, you’ll have a brand new MKV file with the extracted audio file you added. Since we are not altering or re-compressing the video you don’t need to worry about losing any quality in the video.
Conclusion
That’s all. Now, the video files will play on your TV without the warning Unsupported Audio Format. There is another very popular free software called Avidemux, this tool also can do the audio conversion of a file easily. But, the drawback is, the tool hangs up if you try to load a video file of very large in size like Ultra HD video files.

Hello! I am Ben Jamir, Founder, and Author of this blog Tipsnfreeware. I blog about computer tips & tricks, share tested free Software’s, Networking, WordPress tips, SEO tips. If you like my post /Tips then please like and share it with your friends.


