Have you been struggling to display/put images side by side in columns and rows in WordPress editor? Here’s how to put images side by side easily.
By default when you add multiple images in WordPress posts they appear in a vertical column on top of each other.
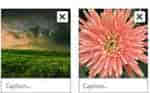
This may not be an issue if you have two or three images, however, if you are adding multiple photos to a blog post, then this doesn’t look very clean, the images may occupy a lot of space and require a lot of scrolling for your users. See the image below
In this article, you will learn how to easily put two or three images side by side in WordPress posts. This way images will appear in a compact layout and improve the user experience on your website.
This method does not require any plugin and works fine if you don’t add multiple images too often.
Step1: Create a new post where you want to place multiple images or you can edit an existing post where you want to display images.
Step 2: On the post edit page, click on the “Add Media” button, this will open the media uploader page.
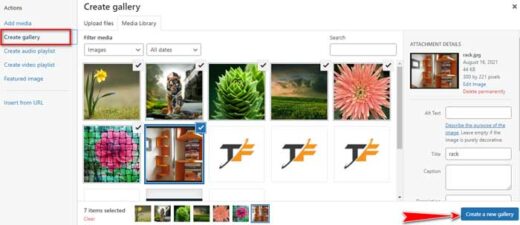
Step 3: Next select and upload all the images that you want to display on your post. After the upload, you will see all the images in your media library.
Step 4: The images you just uploaded may already be selected, if not hold the control tab on the keyboard and click on each image that you want to display to select.
Step 5: Next on the left column click on the “Create Gallary” link and then click on “Click a new gallery” at the bottom right.
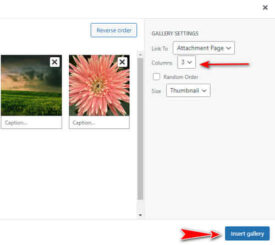
The gallery settings option will appear as a new pop-up on the right. Here you can select the number of columns, edit image links, what size to display, and select display order.
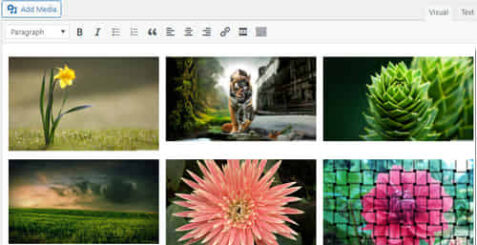
Step 6: Once options are selected click on the insert gallery at the bottom.WordPress will insert your gallery with all the images on your post, in columns and rows that you have selected earlier. See below
As you can see above all the six selected images are put side by side in WordPress editor.
If you need to change the number of columns or other settings just click to select your gallery and click on the pencil icon to edit.
This is the easiest and clean way to put images side by side in columns and rows in WordPress editor. After your gallary of images is inserted you can continue writing your post, preview, and publish.
Hello! I am Ben Jamir, Founder, and Author of this blog Tipsnfreeware. I blog about computer tips & tricks, share tested free Software’s, Networking, WordPress tips, SEO tips. If you like my post /Tips then please like and share it with your friends.
We use cookies on our website to give you the most relevant experience by remembering your preferences and repeat visits. By clicking “Accept”, you consent to the use of ALL the cookies.
This website uses cookies to improve your experience while you navigate through the website. Out of these cookies, the cookies that are categorized as necessary are stored on your browser as they are as essential for the working of basic functionalities of the website. We also use third-party cookies that help us analyze and understand how you use this website. These cookies will be stored in your browser only with your consent. You also have the option to opt-out of these cookies. But opting out of some of these cookies may have an effect on your browsing experience.
Necessary cookies are absolutely essential for the website to function properly. This category only includes cookies that ensures basic functionalities and security features of the website. These cookies do not store any personal information.