Last updated on September 25th,>>>
System Restore is a Windows feature that can help fix certain types of crashes and other computer problems. Here’s how it works, how to perform a system restore in Windows 8, 8.1.
Page Contents
WHAT IS SYSTEM RESTORE
System Restore is a recovery feature in Windows. This feature allows you to restore your computer to a previous state. This is a very useful feature, if your computer functions poorly or crashes, has become slow, and you don’t know the reason.
To resolve these problems, you can use System Restore to restore your computer. Windows system restore will restore your computer to a previous state when your computer was working properly.
System Restore is enabled by default in Windows unless the user disables it. Windows system restore automatically creates snapshots called restore points.
Windows basically takes an exact snapshot of your system i.e the C drive. This includes everything that you installed along with the operating system and drivers.
Windows restore points are created automatically. It is also possible to manually create a restore point at any time if you are planning for a major modification to your system. For example, installing new hardware or for testing software.
But you must know that, when a system restore point is created, it only backups up your system files, program files, Drivers, and the Windows configuration.
It does not back up your other personal data such as email, pictures, documents, videos, saved games, and music. Therefore, it’s important to have separate partitions to save your data.
How to perform a System Restore in Windows 8, 8.1
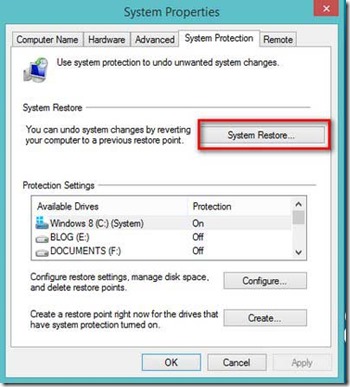
To access the system restore in windows 8, go to windows start screen and in the search field type “restore point”. In the search result click on the option “Create a restore point”

You will be shown the System properties window with the System protection Tab selected. As shown in the image below.

To restore your system click on the “System restore” tab. You will be presented with the main system restore screen. Read the description of the windows of the system restore and click on the next tab.
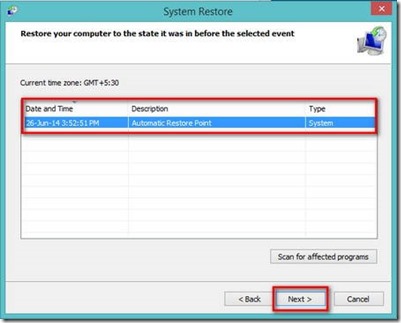
Here you will be presented with the available system restore point that you can restore.

Click on the restore point date you want to restore by left-clicking on it.
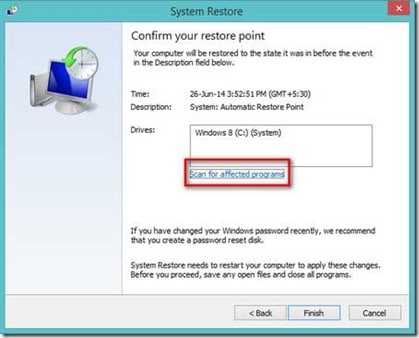
Then click on Next. On the next screen of windows, system restore you will be given an option to see the list of affected programs.
This only means that the programs installed and changes that you made after the restore point date, can not be restored. You’ll need to reinstall the affected programs.

Once you are sure about the system restore date, click on the finish button.
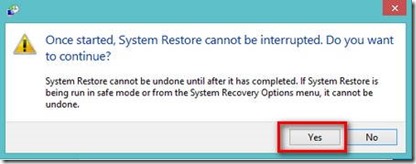
Windows will display a final screen asking you if you are sure. Because windows system restore once started can not be stopped and there’s no turning back.

If you are sure just click on the Yes button.
Windows will start to restore your system. You have to be patient, it will take some time, depending on the size of the windows system restore size.
Windows will restart restore all your system files, windows registry, drivers, programs and restart windows as it was when the system restore point was created.
On successful completion of system restore windows will display the following message. “ System restore completed successfully. The system has been restored to >Date< >time<. Your documents have not been affected “
Relax, your computer has been restored exactly to the same state when the system restore point was created.

Hello! I am Ben Jamir, Founder, and Author of this blog Tipsnfreeware. I blog about computer tips & tricks, share tested free Software’s, Networking, WordPress tips, SEO tips. If you like my post /Tips then please like and share it with your friends.


