When you have invested in a professional security system for your home or property, nothing beats the convenience of being able to see your security camera live feeds.
If you have installed CCTV surveillance cameras in your home, here’s how to view live CCTV footage on your PC or Laptop.
Page Contents
Live View via PC Software or Mobile App
Most security camera comes bundled with PC client software and mobile apps that you can use to access security camera live video feeds. This makes the process much easier. All you have to do is to install the software and follow the instructions.
It’s always advisable to use the security system manufacturer’s PC software or mobile app to access the camera for security and reliability reasons.
In this article, we will show you how to view live CCTV footage without any software
How you can view CCTV live Footage on your PC or laptop
Its very simple to view your home or office CCTV camera stream on your laptop or PC. This can be done via a web browser.
Talking about web browsers, you might face problems with IE because of ActiveX issues with I.E (Internet Explorer).
Google Chrome is the preferred web browser to view live CCTV footage. In the newer version of google chrome (version 42 and above), you may get an error message like the following..
Please install plugins first! (Please make sure you have enabled NPAPI. Please go to chrome://flags/#enable-npapi interface and then check the box to enable NPAPI function)
The above post explains what needs to be installed in Google Chrome, to enable you to view live CCTV footage on PC / Laptop.
Now that you have read the above post, I assume you have already installed the IE tab plugin in chrome.
We are now set to go, to view live CCTV footage on PC.
1st Step: Your DVR must be connected to the Internet, preferably with a LAN cable from your home Router. All DVR has a LAN port to connect.
Switch on your CCTV DVR ( Steps explained here is for CP Plus CCTV DVR) but should work for any brand.
2nd Step: On the CCTV camera view monitor, right-click – click on the main menu – and log on to the DVR settings page.
3rd Step: In the main menu – under settings- click on Network.
Get the CCTV Camera DVR IP Address.
4th. Step: In the Network menu Click on TCP/IP on the left column.
On the right under TCP/IP, click the radio button DHCP
You will observe all numbers under IP address, subnet mask, default gateway will become zero. Something like 0.0.0.0. Just click on apply then save and log out/sign out of the main menu.
5th. Step: Re-login to DVR, as before –click on the main menu – then settings – Network. Now you will see all settings under IP address, subnet mask, default gateway has been populated.
6th. Step: This is the most important step:
Note down the IP address. it will be something like 192.168.0.104 as in the image above. This is your CCTV camera DVR’s IP address.
You will need this IP address to connect to the DVR from your laptop or PC.
Make the IP Address Static disable DHCP
7th. Step: Now click on the radio button (under TCP/IP menu) to enable STATIC, this will disable DHCP which we enabled earlier.
Basic idea is to keep your DVR IP address static so that it does not change every time the DVR reboots.
Click on Apply to save settings and logout.
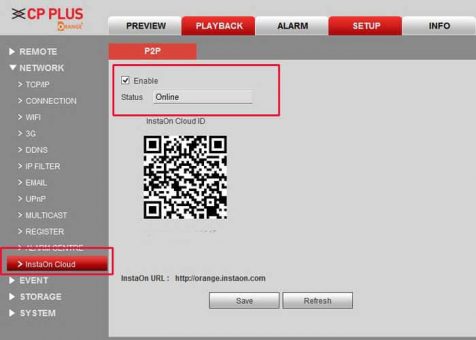
8th. Step: We are almost done. Lastly, under settings – Network menu – at the bottom click on “InstaOn Cloud”. On this page put a checkmark to Enable InstaOn cloud.
Make sure that the DVR is connected to the internet with a LAN cable and the status shows ONLINE. See the image below. Save and log out.
View Live CCTV footage on Laptop
Now your DVR is all set and you can view live CCTV footage on PC.
In your PC or Laptop, open the Google Chrome browser. In the address bar type the DVR IP address (noted earlier in the 6th step). Press enter. Chrome will display the following message.
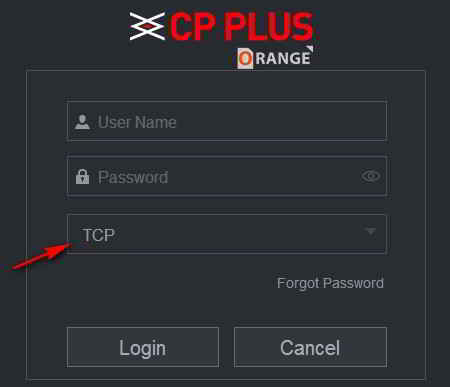
Now just click on the IE Tab plugin icon ( which we installed earlier) on the top right, Chrome will refresh to display the login page.
Here enter your user name and password (same as the DVR). Choose TCP and Click on the LAN button – then click the login tab.
All cameras will load. On the left, it will display all the cameras installed. You won’t see any live feed from the CCTV as of now.
Just click on the “Open all” at the bottom of the left column. You will start to view live CCTV footage on your PC or Laptop Live.
All menus will work exactly the same as in the CCTV monitor screen. You can view recorded footage, take snapshots, download CCTV footage, just about everything.
Hello! I am Ben Jamir, Founder, and Author of this blog Tipsnfreeware. I blog about computer tips & tricks, share tested free Software’s, Networking, WordPress tips, SEO tips. If you like my post /Tips then please like and share it with your friends.
We use cookies on our website to give you the most relevant experience by remembering your preferences and repeat visits. By clicking “Accept”, you consent to the use of ALL the cookies.
This website uses cookies to improve your experience while you navigate through the website. Out of these cookies, the cookies that are categorized as necessary are stored on your browser as they are as essential for the working of basic functionalities of the website. We also use third-party cookies that help us analyze and understand how you use this website. These cookies will be stored in your browser only with your consent. You also have the option to opt-out of these cookies. But opting out of some of these cookies may have an effect on your browsing experience.
Necessary cookies are absolutely essential for the website to function properly. This category only includes cookies that ensures basic functionalities and security features of the website. These cookies do not store any personal information.