Last updated on April 27th,>>>
With Mobile phones, text messages are one of the convenient ways to be in touch with family, friends, and colleagues. But with limited space in Phones internal memory over time you run out of space unless you delete your old messages regularly.
But the problem is that after deleting the text messages, they can be recovered. Most people may not know that simply by deleting a message the messages are not really gone and still remain on the storage system.
Most data recovery program can easily scan out all of your already deleted messages from Android phone and recover them.
If there are any sensitive or important messages in your Android phone then you need to permanently delete and erase those text messages from android.
Check out: 5 Best Call Blocker App For Android Without Ringing
Page Contents
Two Methods to permanently delete text messages from Android
Method 1: Manually delete messages or factory Reset
Method 2: Permanently delete and erase text messages from Android with Safewiper Android Eraser
Method 1:Manually Delete Messages or Factory Reset
You can manually delete your messages or even do a factory reset on your Android phone. But remember your deleted messages can still be recovered by specialized Android data recovery software.
You can either delete group conversations or individual messages inside of a conversation with the following steps
Delete individual messages inside of a discussion:
1) Tap or long-press the required messages
2) Tap the delete symbol and afterward select the messages inside of the conversation you need to erase.
3) Tap Delete and tap OK.
4) Then chosen individual messages will be deleted.
Drawback: Deleting messages in this way is 100% recoverable by most Android data recovery software.
When you delete a message or other data, the deleted data is not really wiped from your phone storage space, in fact, it still remains on your Android’s internal memory and waiting for new data to be overwritten.
In case you missed: Best App To Free Up Space On Android Phone
Method 2: Permanently Delete Text Messages with Android Data Eraser
Most Android users may not know that simply deleting messages does not erase the data, the messages are not really gone and still remain on the storage system.
Most data recovery programs can easily scan out all of your already deleted messages from Android memory and storage space and recover them.
If you have any sensitive or important messages in your Android phone and need to be erased permanently, method 1 isn’t advisable Instead, the Safewiper Android data eraser program scans all your already deleted and existing messages from your Android phone, and permanently deletes all information from your Android phone.
Destroys data with a military-grade wiping algorithm, your data will be impossible to recover even with the most sophisticated tools.
Features of SafeWiper for Android
100% Wipes everything permanently beyond recovery.
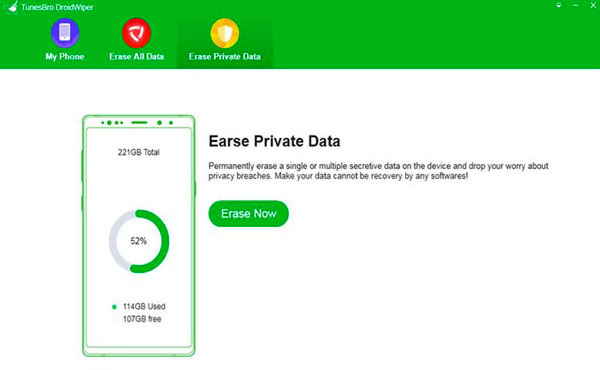
• Built-in three wiping modes: Erase All Data, Erase Private Data, Erase App Data.
• Wipes confidential files and folders permanently from Android internal memory and SD card.
• Support 2000+ Android devices including Samsung, LG, HTC, Motorola, Sony, Huawei. etc.
• Fully compatible with the latest Android 7.0 Marshmallow.
Permanently Delete Text Messages From Android with SafeWiper for Android
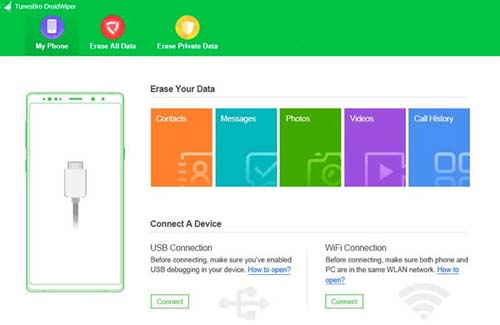
Step 1: Connect Android Device to PC and Turn on USB Debugging
Download and install SafeWiper for Android program on your computer. Windows and Mac are both available.
After installation is complete, launch the program. You will need to connect your Android phone to the same computer via USB cable, don’t forget to enable USB debugging on your Android phone.
If your phone is running on Android OS version 4.2.2 or above, then it will pop up a message on your phone asking you to allow USB debugging. Simply Tap on OK to continue.
Step 2: Select Erasing Option
After launching the program you will find three erasing options, just click on “Erase Private Data“. This brings up the data scanning window, click the “Erase” button to let the program scan your content.

Step 3: Select the Data You Want to Erase
After the scanning is complete, all the data stored in your phone will be displayed in the program, you just need to select the data type you want to delete permanently, then click the “Erase” button.
If you plan to sell your phone and erase everything you can select that option and confirm by typing the “Erase” word in the box.

You can also choose and set the security level. You will get three security level options
1: High level:( 7 times) This level is recommended if you have saved personal information like bank records, passwords, or any financial informations.
2: Medium Level:( 3 times Recommended) Droid/Wiper will overwrite your Android device with junk files to ensure that files are not recoverable. No one will know you have erased your device.
3: Low Level: ( 1 time). Drop/wiper will overwrite all of your data with Zeros to ensure that the files are not recoverable.
step 4: Begin to Erase Android Device
Once you have selected the options as described above, in this final step the program will start wiping the device. So please make sure all your data is backed up if you need to. You can use the program to back up your device data also.
It will take a while to complete the task depending on how many files stored on your device.
Check out: How To Hide Photos And Videos On Android Phone or Tablet
Conclusion:
Once the data is deleted by the program, there is no chance to get them back because of the sophisticated algorithms adopted by the program.
The traceable footprints have gone forever and no data recovery software can recover.
This Android Data Eraser program is a must-have tool if you change your Android device frequently and want to permanently delete Text Messages or all data From your Android device.

Hello! I am Ben Jamir, Founder, and Author of this blog Tipsnfreeware. I blog about computer tips & tricks, share tested free Software’s, Networking, WordPress tips, SEO tips. If you like my post /Tips then please like and share it with your friends.


