Last updated on December 30th, at 06:14 pm
Setting up the Internet Sharing feature in Windows is easy. Windows makes it easy for you to get connected to the Internet and to share Internet connection in Windows with other computers/ devices in your network.
For this, you can use the Windows Internet Connection Sharing (ICS) feature on your Windows 7 computer to let one or more device share in your Internet connection.
Internet Connection Sharing (ICS) is a feature that allows a device with Internet access to act as a host or access point for other devices to connect to the Web.
How to set-up a wireless network to share internet connection, between Computers in Windows 7 and other devices to Share Internet Connection.
Ad hoc wireless connection between computers and devices can be established without a router.
With this How to Tip You can set up a wireless network to share internet connection wirelessly from your Laptop with another PC or Laptop. And other devices capable of connecting wirelessly.
If you are using the internet on your laptop and want to set up a wireless network to share internet connection with other wireless devices than follow this Guide.
How to share Internet connection in Windows
An ad hoc network is a temporary connection between computers and devices used for a specific purpose. Such as sharing an internet connection, documents, data during a meeting, etc.
Ad hoc networks can only be wireless, so you must have a wireless network adapter installed on your Desktop computer.
Connecting Laptops, and most Mobile phones, are quite easy since they have built-in wireless adaptors.
STEP-1:
Click on the “Start” button
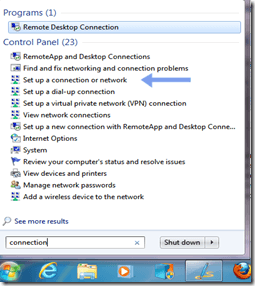
Type connection or network in the search box
From the menu that you get select “Set up a connection or network
STEP 2:
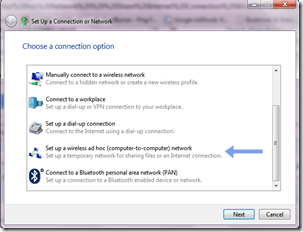
In the next window scroll down and click on the “Set up a wireless ad hoc (computer to computer) network as shown below.
STEP: 3
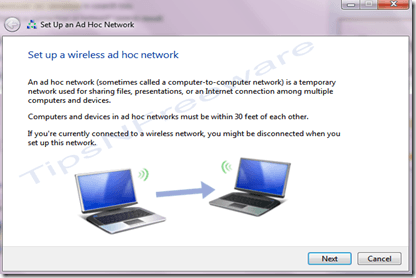
Click on the “Next” button. And you will get the following screen.” Set up a wireless Ad Hoc Network. Just click on the “Next” button
Give a name to your wireless network
STEP: 4
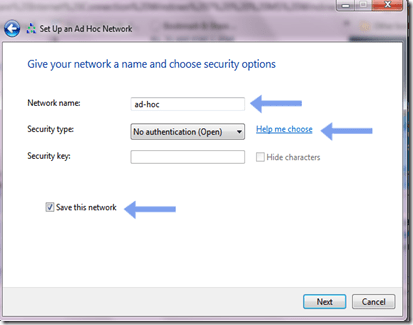
In the next window” Give your network a name and choose security options” under the “Network name” give a name like “Ad-Hoc”
Under Security type from the drop-down menu choose” No authentication(open)
Keep the “Security key” blank (more on that later)
Check on “save this network” as shown below.
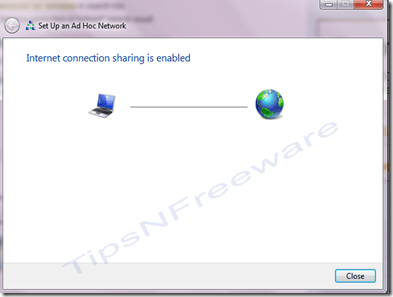
Now again click on the “next” button. The system will create an ad-hoc wireless connection and will show you the following window.” Internet connection sharing is enabled”
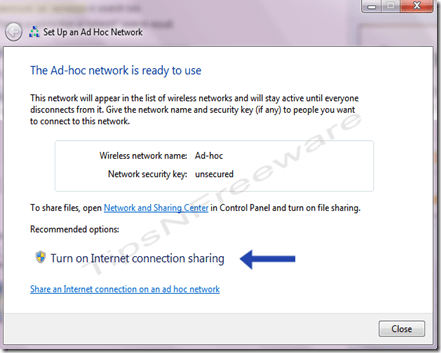
Then a window will show “The Ad-hoc network is ready to use”
Here click on the “ Turn on Internet connection sharing”
STEP: 5
On clicking that you will see the following message “Internet connection sharing is enabled”. Now click on the “close” button.
You have successfully set up an Ad-hoc connection. Any Laptop or device with Wi-Fi adaptor will now be able to share internet connection from your laptop’s Internet connection
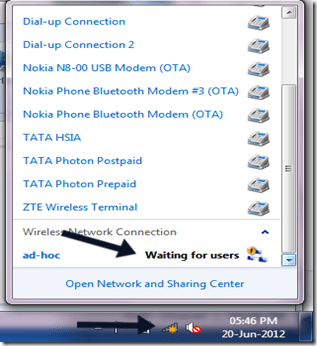
Immediately after that, you will see the availability of the Wi-FI signal icon on your taskbar and your “Ad-Hoc” wi-fi name clearly displayed in the available connections as shown below.
STEP: 6
Now you can test your Wi-Fi with any device having a wi-fi adopter. Try your Mobile phone or Laptop, enable the Wi-Fi in the device, it will search and will detect it Ad-Hoc signal (since we named it as Ad-Hoc).
Connect your device and surf the net or share any file between the connected devices.
If you want to secure the connection with a password then just follow these steps.
SECURE YOUR AD-HOC Wi-Fi
Click on the Start button and on the search Box type “manage wireless” from the displayed menu click on “Manage wireless networks”
From the list, you will see your “Ad-Hoc” wireless, select it then right-click on it, then click on “Properties” in the properties window click on “security”
On the security type select “Wep” than it will display the “Security code” box. There you can enter your security code then click on OK.
Now your Ad-Hoc wireless is secured if any device needs to connect to the internet or share any data must input the correct security code.

Hello! I am Ben Jamir, Founder, and Author of this blog Tipsnfreeware. I blog about computer tips & tricks, share tested free Software’s, Networking, WordPress tips, SEO tips. If you like my post /Tips then please like and share it with your friends.





I have followed your steps and everything was running perfect. Then my phone (Nokia N8) dropped the wireless connection, it seems to keep the connection for two minutes then loses it.. Can you help me to set up a secure stable connection between the two?
Hello ?"Between the two" you said,I assume you are using your N8 as a wi-fi hotspot to connect your laptop. If your 3G signal is strong enough, it doesn't drop.I have observed this too but by changing the location where the signal is strong (showing all the bars)it works fine. In fact I'm using it right now.The paid version of Joikuspot is very stable and cheap too.