Last updated on June 20th,>>>
Hummingbird is a WordPress speed optimization plugin. If you have installed this plugin on your WordPress site, and want to uninstall it safely to install other cache plugin like Wp Super cache, follow this step by step guide.
Here’s how to safely uninstall Hummingbird plugin from your site.
Hummingbird WordPress plugin is a caching and performance-enhancing. It has over 70k +active installs, but the plugin can cause issues and does not work well as a page caching plugins.
Just deactivating and deleting the plugin most of the time does not delete the advanced-cache.php entries that it adds.
Simply uninstalling also will not remove the constant added into your site’s wp-config.php.
You may also Like to read 10 Ways How To Speed Up WordPress Site ! in Few Minutes
Safely Uninstall Hummingbird Plugin
The file to remove if you no longer want to use Hummingbird is wp-cache.php in the wp-content/wphb-cache folder. You can delete the wphb-cache folder from the wp-content folder on the site server.
The other entry that Hummingbird creates is in the wp-config.php file. It makes the following entry
define('WP_CACHE', true); // Added by WP Hummingbird
If on deleting the Hummingbird this line is not deleted from the wp-config.php file, and you try to install another caching plugin like WP super cache, you will get an error.
Hummingbird plugin on uninstall normally will remove the created options it sets on activation.
wphb_settings
 wphb_version
 wphb-caching-data
 wphb-free-install-date
 wphb-gzip-data
 wphb-last-report
 wphb-notice-uptime-info-show
 wphb-quick-setup
 wphb-stop-report
Check Data and Settings of the plugin before deleting
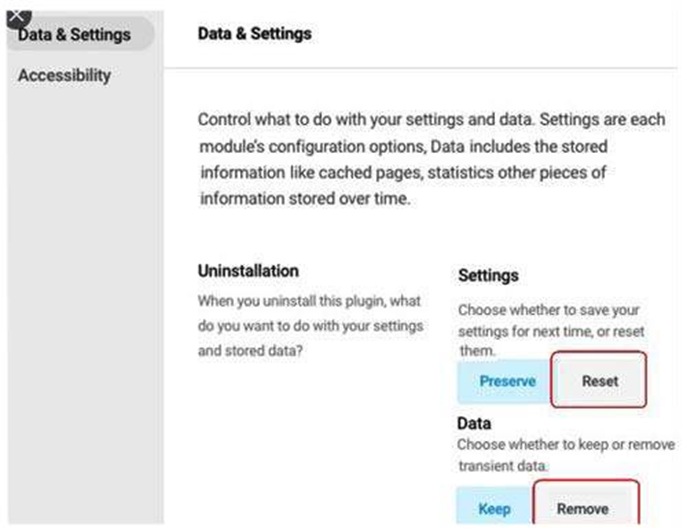
Before you deactivate and uninstall the plugin, to ensure all Hummingbird data is removed when you uninstall Hummingbird plugin, go to the following settings > Hummingbird > Settings > Data & Settings
Set uninstallation settings to reset and data to remove ( see image below)
Delete htaccess entry
Log on to your cPanel, under file manager search for the .htaccess file. Right-click on the file and select the edit option. If you find any entry made by the plugin delete it.
Please do keep a backup of your .htaccess file for safety. If you are using the Yoast SEO plugin, you can edit .htaccess file from Yoast > Tools > File editor.
See also 5 Best SEO plugin to rank high in SERP.
The .htaccess file entry will start as #BEGIN WP-HUMMINGBIRD-CACHING and end with # END WP-HUMMINGBIRD-CACHING. You can safely delete all the entries between these two entries. Delete the start and End entries also, then save the htaccess file.
# BEGIN WP-HUMMINGBIRD-CACHING
 <IfModule mod_expires.c>
 ExpiresActive On
 ExpiresDefault A0
 <FilesMatch "\.(txt|xml|js)$">
 ExpiresDefault A691200
 </FilesMatch>
 <FilesMatch "\.(css)$">
 ExpiresDefault A691200
 </FilesMatch>
 <FilesMatch
 "\.(flv|ico|pdf|avi|mov|ppt|doc|mp3|wmv|wav|mp4|m4v|ogg|webm|aac|eot|ttf|otf|woff|svg)$">
 ExpiresDefault A691200
 </FilesMatch>
 <FilesMatch "\.(jpg|jpeg|png|gif|swf|webp)$">
 ExpiresDefault A691200
 </FilesMatch>
 </IfModule>
 <IfModule mod_headers.c>
 <FilesMatch "\.(txt|xml|js)$">
 Header set Cache-Control "max-age=691200"
 </FilesMatch>
 <FilesMatch "\.(css)$">
 Header set Cache-Control "max-age=691200"
 </FilesMatch>
 <FilesMatch
 "\.(flv|ico|pdf|avi|mov|ppt|doc|mp3|wmv|wav|mp4|m4v|ogg|webm|aac|eot|ttf|otf|woff|svg)$">
 Header set Cache-Control "max-age=691200"
 </FilesMatch>
 <FilesMatch
 "\.(jpg|jpeg|png|gif|swf|webp)$">
 Header set Cache-Control "max-age=691200"
 </FilesMatch>
 </IfModule>
 # END WP-HUMMINGBIRD-CACHING
That’s how you can safely uninstall Hummingbird Plugin, should you decide to try other caching plugin.
See also 1: How to write SEO friendly Title Tag! Best practices.
2: 3 Highest Earning Google AdSense Placement! You must try.

Hello! I am Ben Jamir, Founder, and Author of this blog Tipsnfreeware. I blog about computer tips & tricks, share tested free Software’s, Networking, WordPress tips, SEO tips. If you like my post /Tips then please like and share it with your friends.

