Its frustrating to encounter the “Leverage Browser Caching” warning in your WordPress site’s performance reports. It’s a common culprit behind slow loading times, impacting user experience and SEO rankings.
This warning essentially signals that your website isn’t efficiently utilizing browser caching, a crucial technique for speeding up page loads.
This seemingly technical issue is surprisingly easy to address with the right knowledge and tools. Whether you’re a seasoned developer or a WordPress beginner, optimizing browser caching is within your reach.
We’ll explore simple, effective methods, including utilizing plugins and editing your .htaccess file, to eliminate this warning and boost your website’s performance.
Leverage Browser Caching means storing static files of a website in a visitor browser. And then retrieving them from the browser quickly instead of again from the server. Actually, it uses to speed up each page of a website
Leverage browser caching, you must have seen this warning while using site speed tools like GTMetrix, Google page speed insight tools.
What is Leverage browser caching is all about?
In simple words, When you visit a web page, your browser downloads all content of the particular page as well as common static files like CSS and js files. And when you visit other pages of the same website, your browser downloads them again.
But if you have enabled Leverage Browser Caching, then all statics files will be served from your browser cache instead of from the server.
So when you visit any page of the particular website, it will only download unique contents of the page and static files will be served from your browser cache. in this way, it speeds up each page of a website.
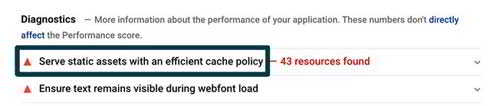
The Leverage Browser Caching warning is one of many diagnostics Google PageSpeed used to return as ” Consider Fixing: Leverage browser catching” a suggestion for improving your site score.
From Version 5 of Google PageSpeed Insights, this message was replaced with the “Serve static assets with an efficient cache policy” warning but the solution to these warnings is the same.
Now, What Does this mean?
If you’re seeing the “Leverage Browser Caching” warning in your performance test results, it likely means one of two things:
1: The Cache-Control or Expires headers are missing from your site’s server or that of a third-party like Google AdSense. 2: The necessary headers are present, but the expiration period is very short and therefore doesn’t have much impact on performance.
The solutions to this warning involve fixing one or both of these issues. This involves very little changes and is not complicated to implement.
What we need to do is set content expiry dates by adding Cache-Control Headers andETag Headers in HTTP headers.
There are two headers related to browser caching, Cache-Control and Expires. At least one must be present to enable browser caching for your site. This is how browsers determine how long they should retain resources before refreshing them.
Cache-Control header declares the caching period of a particular file or type of file, like your CSS, JS image files, etc. The ETag is then used to verify if any changes have occurred between the cached and requested resources.
2. Add Cache-Control Headers and Add Expires Headers in .htaccess file (no plugin needed)
Method 1: Fix leverage browser caching issue with Plugin
Download and install the Leverage browser caching plugin.
Activate the plugin and you’re done. Test your website to confirm that the new settings are working correctly and the warning is gone
In fact, this is one of the easiest ways to make your WordPress website faster. It involves very little effort at all from your side and is one of the high priority tasks recommended by Google to make your website load faster.
Method 2: Leverage Browser Caching using .htaccess file
Please Note: When you are editing.htaccess it’s important to exercise maximum caution since errors on .htaccess file will cause your site to crash.
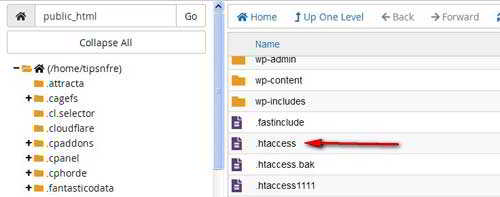
This is a hidden file, so when editing .htaccess in the cPanel, you need to enable the setting ‘Show Hidden Files’ for you to view and edit .htaccess. Make sure you make a backup copy of your .htaccess file.
Log on to your cPanel of your host > Click on file manager and under public_html folder right click on .htaccess file and choose the edit option
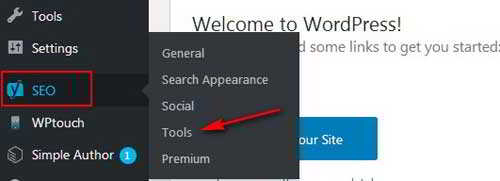
Additionally, if you are using Yoast SEO plugin for your site SEO yo can access .htaccess file directly from your WordPress admin dashboard.
On your WordPress dashboard go to SEO > Tools > File editor
Add Cache-Control and Expires Headers in .htaccess file
As explained above, in whatever way you can access your .htaccess file, right-click on it to edit and add the following edits to the bottom of the file.
Add Expire Headers with long expiry times. Set these values as long as it makes sense for your site – 1 month is good enough.
After adding the above edits, save your .htaccess file.
Conclusion:
With the above instruction in .htaccess file, we are setting assets that refresh quickly such as the HTML of your page to expire after 600 seconds (this is because HTML typically changes more frequently).
We have also set the CSS and Javascript to only expire once a month (such files only change if you make changes to your template or plugins).
What does this means, is that if your visitor visits the page again within a month, they don’t need to re-download your CSS and JS assets again. If you rarely perform these types of changes on your site you can set the value higher, to 1 year, similar to the jpeg, png expires header.
This is the most effective way to leverage browser caching for WordPress or other websites that make use of a .htaccess file.
Hello! I am Ben Jamir, Founder, and Author of this blog Tipsnfreeware. I blog about computer tips & tricks, share tested free Software’s, Networking, WordPress tips, SEO tips. If you like my post /Tips then please like and share it with your friends.
We use cookies on our website to give you the most relevant experience by remembering your preferences and repeat visits. By clicking “Accept”, you consent to the use of ALL the cookies.
This website uses cookies to improve your experience while you navigate through the website. Out of these cookies, the cookies that are categorized as necessary are stored on your browser as they are as essential for the working of basic functionalities of the website. We also use third-party cookies that help us analyze and understand how you use this website. These cookies will be stored in your browser only with your consent. You also have the option to opt-out of these cookies. But opting out of some of these cookies may have an effect on your browsing experience.
Necessary cookies are absolutely essential for the website to function properly. This category only includes cookies that ensures basic functionalities and security features of the website. These cookies do not store any personal information.


|Speed Up WordPress")
|Speed Up WordPress")


")