Last updated on May 28th,>>>
Learn how to host Google Analytics locally in WordPress and boost your site performance, get rid of the leverage browser caching for cacheable resources warning from speed testing tools like GTMetrix, including Google PageSpeed Insights.
In this post, you will learn
1: What is Google Analytics?
2: Why host Google Analytics locally in WordPress?
3: Best Plugin to use and how to configure
Check out: How To Measure Your Website Page Load Time Correctly
Page Contents
What is Google Analytics?
When it comes to keeping track of your website performance and analysis! Google Analytics is the gold standard.
Some of the key features of Google Analytics include the ability for you to keep track of your website’s analytics, track the number of visitors on your site in real-time, find what people are looking for on your site, view your top-performing blog posts and pages.
Keep a track on which of your online campaigns are performing well, which marketing strategies are bringing in more traffic to your website, which country does most of your site visitors come from, etc.
These are just some of the key benefits of using Google Analytics on your website.
Why host Google Analytics locally in WordPress?
Ironically two biggest issues that are reducing page load speed are Google Adsense Ads and Google Analytics code.
Check out How To Improve The Page Speed Of Google AdSense Site
Google Analytics (GA) uses a few lines of JavaScript code to track your web analytics. You need to paste this code into your website’s header or footer section.
Once you paste that tracking code Google Analytics will start collecting data whenever someone visits your website and starts interacting with it.
Since the analytics script is loaded from Google’s server and not from the server where your WordPress site is installed, it is impossible for you to add expires headers to it.
And since you cannot add expires headers to the external scripts (GA code in our case), you cannot leverage browser caching.
That is why While testing our site in GTMetrix or PageSpeed Insights, we get a warning about Leverage browser Caching for Analytics. See image below

So in order to improve performance grade and score in the speed testing tool, we can fix this by hosting google analytics locally in WordPress sites.
Advantages of Hosting Google Analytics Locally
1: No more Fix Leverage Browser Caching Warning.
2: Boost your website’s speed-reducing HTTP request.
3: Improve your score in GTMetrix, Pingdom, Google PageSpeed Insights.
4: Minimize Extra DNS Lookup.
Where to find your Google Analytics Tracking ID?
If you already have a Google account like Gmail you can simply visit analytics.google.com and login to your account.

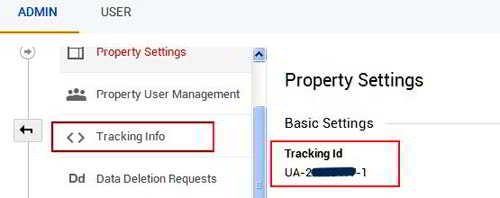
Go to Admin > Property settings > Tracking Id. Copy the tracking ID and save it on a notepad. We will need that shortly.
Hosting Google Analytics locally on your server is easy with WordPress plugins. There are quite a few plugins but the best so far is CAOS (complete Analytic Optimization Suite).
Check out: Easy Way To Add Header And Footer Code In WordPress
CAOS | Host Google Analytics Locally
CAOS is my favorite plugin to host Google Analytics locally on my WordPress site.
Go ahead download and install the CAOS plugin and activate the plugin.
On your WordPress dashboard > settings > click on Optimize Analytics. This will open the plugins settings page.
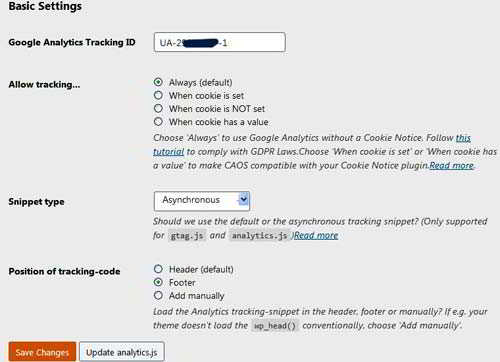
CAOS Basic Settings.
1: Google Analytics Tracking ID: Copy-paste the Google Analytics Tracking ID, which you copied earlier.
2: Allow tracking: Choose “Always” that’s the default.
3: Snippet type: Select Asynchronous ( Default is Synchronous which is render-blocking)
4: Position of tracking-code: You get 3 options, Header (default), Footer, Add manually. In my case I selected Footer.
Scroll down click on “save changes” then click on ” Update analytics.js”
Whether to position the tracking code in Header or Footer? Answered by the Plugin Author
Q. Hi, is it ok to put the tracking code in the footer as Google recommends putting it in the header? Thanks
Ans: Daan van den Bergh ( Plugin Author)
In short: Yes, it’s okay. But would I recommend it? No.
Google recommends putting it in the header because then it’s loaded first, so you can immediately start tracking your visitor. However, Google Pagespeed recommends putting javascript in the footer, since it is render-blocking thus lowering performance and user experience.
So it’s your choice: do you mind that you start tracking your visitor a few 100 milliseconds after they arrived at your site? Or is it the first thing you want your site to start doing before rendering the contents?
CAOS Advanced Settings:
1: Enable Compatibility Mode: None (default)
2: Which file to download?: Analytics.js (default)
3: Serve from a CDN?: If you are on CDN input your sites CDN URL.
4:Enable Preconnect? (Recommended) : Select this to Enable the Preconnect option to connect early with Google Analytics.
5:Use adjusted bounce rate? (seconds): I have set it to 3o seconds. The adjusted bounce rate is that the tracking code will execute and record that event only after the user has spent 30 seconds or more on your website. You can change this according to your choice.
6: Disable all display features functionality?: Recommended checking this box if you don’t use Google Analytics’s advertising features like remarketing, demographics, and interest reporting.
Keep other options to default. Don’t forget to hit the “save changes” tab at the bottom.
Conclusion:
This is how you can host Google Analytics locally in WordPress.
Self-hosting Google Analytics locally on your server is one of the best ways to increase the PageSpeed Score and reduce extra DNS lookup and resolve the “leverage browser caching“ issue.

Hello! I am Ben Jamir, Founder, and Author of this blog Tipsnfreeware. I blog about computer tips & tricks, share tested free Software’s, Networking, WordPress tips, SEO tips. If you like my post /Tips then please like and share it with your friends.


