Last updated on August 13th,>>>
Website loading speed is an important factor for search rankings. Cache plugin plays a very important role to improve site speed. In this guide, I will show you how to install and Setup the WP Super Cache plugin.
WP Super Cache is one of the most popular WordPress cache plugins. WP Super Cache plugin generates static HTML files from your dynamic pages. This makes your site load faster, improving user experience, and search engine ranking.
WP Super Cache is one of the most downloaded WordPress cache plugins and is still a great choice especially because… it’s free.
Unlike the big gun of cache plugin W3 Total Cache, which requires advanced configuration! WP Super cache is almost like a plug-and-play cache plugin. The best part is WP super cache is simple to install and configure.
See also 10 ways to speed up your WordPress site.
Follow this step-by-step guide on how to install and set up WP Super cache which will work for most blogs/websites.
If you are using CDN, here is how to configure WP super cache with Free Cloudflare CDN
Page Contents
How to Install Wp Super Cache
The easiest and the safest way to install Wp Super Cache is to do so from your Wp Admin dashboard.
Go to Plugins > Add new > type Wp Super Cache in the search box. Install and activate the plugin.
You can also download directly from WordPress.org and upload via FTP.
There are two modes to set up the WP Super Cache plugin
::: Simple (recommended)
::: Expert Mode
How to setup Wp Super Cache Plugin – Simple mode
1: In your WordPress admin page then under settings– click on wp super cache. The plugin settings page will open with the following options.
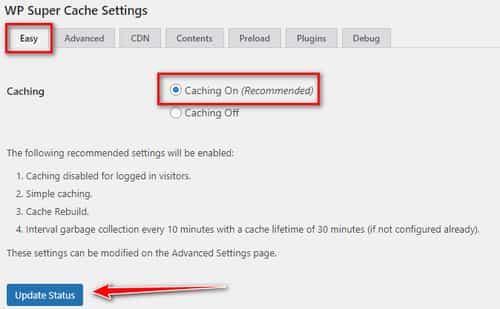
2: Now click on the “Easy” tab and make sure the “Caching on” option is selected. Then click on update status.
3. Now got to the “Advanced settings”. This is the most important page here you will find the most important settings.
Under the Advanced page, you will get two cache delivery methods to setup WP Super Cache.
1: Simple (recommended)
2: Expert
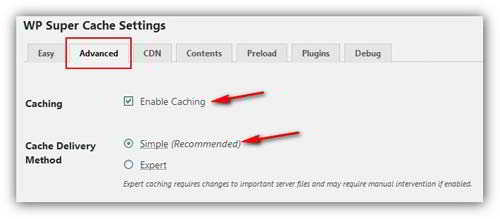
The Simple method is the recommended one. In this method, the plugin does not write any mod rewrite rules in the .htaccess file.
There are quite a few options here but you need to enable only the following settings for optimal performance. These options are similar to both the Simple and the Expert cache delivery methods.
Enable the following functions in Advanced Settings.
1: Check (enable) “Enable Caching”
2: Check (enable): Simple Cache delivery method (recommended)
3: Check (enable) “Disable caching for logged-in visitors. (Recommended)” This basically means you won’t be served with cached pages when you are logged on as Admin.
This is important in situations when you make any changes on your site and you get the option to delete the Cache, which you will see at the top menu on your admin page, so your visitors see only the fresh page (not the old cached page) after the change.
4: Compress pages so they’re served more quickly to visitors. (Recommended). This option enables Gzip compression. Though a recommended setting DO NOT enable it now, will explain later.
5: Check (enable) “Cache rebuild
6: Check (enable) 304 Browser caching. Improves site performance by checking if the page has changed since the browser last requested it. (Recommended)
7: Check(enable) “Mobile device support”. Enable this if you are using a mobile plugin like WPtouch.
Check out our detailed post on How To Setup WP Super Cache and WPtouch Mobile Plugin
8: Check (enable) “Extra homepage checks” this is the landing page of your blog unless of course, you have a static Home page.
We are almost done here just scroll down and hit on “Update Status”.
If you have selected the “Simple Cache delivery method” then you are almost done setting up WP Super cache.
How to setup Wp Super Cache plugin – Expert mode
In the Advanced setting, page select the “Expert” Cache delivery method. Expert caching requires changes to important server files and may require manual intervention if enabled.
After enabling hit the update status you will get this message, or a yellow band with the message “Rewrite rules must be updated” “WP super cache mod rewrite rules detected”
This is normal if you have checked the “Expert“ Cache delivery method. WP super cache needs to re-write these rules in your .htaccess file.
All other settings are the same as in the Simple mode as described above.
So just click on the button “Update Mod_Rewrite Rules”. WP super cache will automatically update your .htaccess file and will show you the rules in green color as shown below which means everything’s fine
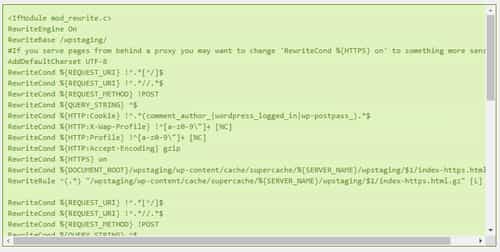
The above image shows WP super cache Mod_Re Write Rules successfully written on your .htaccess file. and you have successfully enabled mod rewrite caching.
You might get a notification about scheduling garbage collection. To fix the garbage collection notice, scroll down on the advance settings page till you see the Expiry Time & Garbage Collection section.
Garbage collection means how long should cached pages remain fresh? A good starting point for Cache Timeout is 3600 seconds.
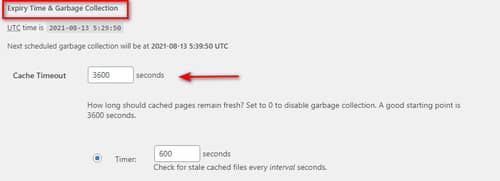
Keep the remaining settings to default and click on the “Change Expiration” tab. The garbage collection notice should disappear.
Now scroll down further and under the “Rejected User Agents” delete all entries there, and make sure that it remains empty after you click on “Save UA settings”
That’s all Leave the rest of the settings in the Advanced section to default.
WP Super Cache Preload Settings
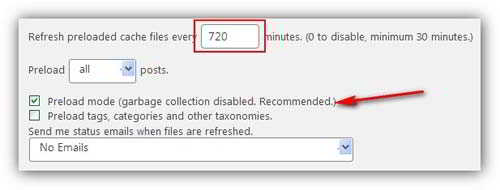
Next Go to the “Preload” tab, under “Refresh preloaded cache files every”……… minute.
The preload settings essentially make the plugin cache all your site’s posts and pages periodically. You can set the time interval between each cache refresh.
This time interval is a very crucial setting.
In shared hosting environments, you should optimally set it to once a day that’s every 1440 minutes.
If you update your site twice a day, then you can set the time interval between each cache refresh to 720 minutes. In the latter setting, the preload cache will be refreshed twice a day.
I would recommend not to use a lower value in shared hosting environments since it might overload server resources.
If you are writing content at least three times a week or once a week, enter the value 10080, this tells super cache to refresh cache once a week.
This setting also works if you are writing once a month. You may like to put a lower value if you write regularly.
Now to preload, all your posts check (enable) “Preload mode”
Now click on “Update settings” then click on “Preload Cache now”
Wp super cache will now create an HTML version of all the posts in your blog which will be kept in the cache directory.
These are the files that will be served to your readers instead of generating everything dynamically using PHP every time a visitor clicks on your blog posts.
If you decide to try another caching plugin Here’s how to uninstall WP Super cache completely from your site.
Check if WP super cache has been configured correctly.
- Logout from your word press admin page, this is important.
- Clear all browser cache.
- Open a new tab on your browser
- Type and visit your home page URL.
- Let the page load completely.
- Once loaded right-click anywhere on the page and click on “View page source”
- You should see the following line at the bottom of your page source code.

It is important that you see the lines “ <!–super cache–>“ at the very bottom because this shows that the page has been served from the super cache static HTML files. You can check any other post page and you should see the same on every page.
To verify further, note down the time stamp and date under “ Cached page generated by WP-super cache on ……” wait for some time then refresh the page to reload then check again the page source code the date and time stamp should be the same as before.
Check out: Fix: Pages Do Not Match ! Timestamps Differ! WP Super Cache
If you don’t see this in the source code of your page then, re-check all your settings again as above.
Enable Gzip Compression
Compression is disabled by default because some hosts have problems with compressed files. As stated earlier under the Advanced Tab and check (enable) “Compress pages” and save your settings, log out and load your home page again and check the source code, you will something like this at the bottom.

Here instead of “Super cache” you will see <!–Compression = gzip–>. This means gzip compression is active and working on your site, this will further speed up your page loading time.
In case you missed: How to correctly measure your website load time
NOTE: If you are using any other compression plugin then disable this feature, as this may break your site.
If this WP Super cache setup settings, do not work well for your Blog (Which is most unlikely)
Then try this workaround:
1: Use Simple caching instead of the Expert cache delivery method.
2: Try disabling Gzip compression in the super cache.
3: Use a third-party compression plugin.

Hello! I am Ben Jamir, Founder, and Author of this blog Tipsnfreeware. I blog about computer tips & tricks, share tested free Software’s, Networking, WordPress tips, SEO tips. If you like my post /Tips then please like and share it with your friends.







Ben, This is one of the Best article on Super Cache, was searching for something like this. Points are very clear and able to follow every step. After following all these steps there is a warning “Warning! Garbage collection is not scheduled!” . Wat exactly is this.
Hello Lokesh Wp cache sets Expire time” to 3600 seconds by default,If your site is very busy than it is advisable to set it to 172800 seconds (which is 48 hours) This can cut your CPU usage in half, which will speed up your site.For a less traffic site you may reduce this.Garbage collection is when WP super cache removes all expired cache file. You can leave the rest to default settings. Donn’t forget to click on save settings.
hey… Nice Post… I am wp super cache but i dont know the optimal settings… Dont know whether it improved my site speed or not… i am gonna check these settings and get back to you… Thank You Very Much! 🙂
Dear Nagaraj ! you wont know unless you try it. These are the most recommended settings for WP super cache, and I am sure it should work for your site too. Do share your sites outcome.
Hi there:
Thanks so much for your contributions…
What is the best settings for this under Advanced?
Scheduler
Timer: seconds
Check for stale cached files every interval seconds.
Clock: HH:MM
Check for stale cached files at this time (UTC) or starting at this time every interval below.
Interval:
Hello Greg ! scheduler means how long your cached pages will be kept before it gets refreshed or re-cached by the plugin. 3600 seconds is a good starting point depending upon how frequently you update your blog.Clock is the time when the plugin collects the garbage, that is refreshes your cached files. 00.00 stands for midnight.You can set it according to your liking, but I feel the default is best and works fine.
Hope it helps.
Thank you for commenting
Oh, also, what do you think about this under Advanced?
Enable dynamic caching (mfunc, mclude, dynamic-cached-content). See the FAQ for further details.)
Mobile device support. (External plugin or theme required. See the FAQ for further details.)
Hello Greg ! Under the advanced settings details about mfunc, mclude, dynamic-cached-content, is clearly explained by the author under FAQ. And answering all is beyond this comment section. One thing is clear, that to enable these functions you can not use mod_rewrite mode which happens to be fastest mode. But you will have to use either PHP or legacy mode catching.
As for mobile device caching I don’t think you will need these plugins if you are using a responsive theme.
Thanks for this tips, I just installed wp super cache on my blog using your settings and it was successful
Hai Donatus !! Glad it was of help to you. I would suggest you install WP minify or Better WP minify (if you have not yet installed) this will further speed up your site. Do let me know.
Thanks for both comments…smile.
Welcome Greg !! Thanks for appreciating