Last updated on October 10th,>>>
A slow-loading website can significantly impact user experience and search engine rankings. For WordPress users, optimizing website speed is a crucial task that can be achieved with the right tools and techniques.
Fortunately there is no dearth of free WordPress plugins.
These plugins are designed to address various performance bottlenecks, from optimizing images and minifying CSS/JS files to caching content and improving database queries.
By installing and configuring these plugins, you can dramatically reduce page load times, enhance user satisfaction, and improve your website’s overall SEO.
In this article, we will explore some of the best free plugins available to speed up your WordPress website. You will learn how to effectively use them to optimize performance.
Whether you are a beginner or an experienced WordPress user, this guide will provide valuable insights and practical tips to help you create a faster and more efficient website.
So, let’s dive in and discover how to turbocharge your WordPress site with the help of free plugins!
In this post, we will share with you 3 free plugins to speed up your WordPress site load time within few minutes.
Do you use Google AdSense for site monetization? AdSense is well known for slowing down site loading time. See this detailed post on how to Improve the Page Speed of Google AdSense site.
For your own satisfaction, just check your WordPress site speed in GTmetrix, Pingdom, and Google Pagespeed insights. Note down the performance scores to compare later at the end of this post.
So Let’s Dive in
Page Contents
Speed up WordPress website
1:WP Super: Cache plugin for effective caching
WordPress Cache plugin plays a very important role to improve site speed. WP Super Cache is one of the most popular WordPress cache plugins.
WP Super Cache plugin generates static HTML files from your dynamic pages. This makes your site load faster, improving user experience, and search engine ranking.
Now, which cache plugin is the best, is debatable. I think it’s individual choice and preference. I have been using the WP Super Cache plugin right from day one.
To date, this cache plugin has performed and has not faced any compatibility issues with any other plugin. Because of its benefits and ease of configuration, this free plugin is trusted by millions of publishers globally.
WP Super cache was and still is one of the most popular Cache plugins. At the time of writing this post, more than 2 million downloads and counting. Of the 1228 reviews, this plugin has received 901 five-star ratings.
These figures speak volumes of the popularity of this cache plugin, with WordPress site webmasters.
You can download this plugin from the WordPress repository. Configuring this plugin is easy, not as complicated as other cache plugins like W3 total cache.
See my detailed post on How to install and set up Wp Super cache for optimal performance.
This link will open in a new tab. Install WP Super cache on your site and configure accordingly or if you already have installed WP Super cache, compare the settings, for optimal performance.
2: Autoptimize WordPress Plugin
Autoptimize the WordPress plugin, if configured correctly can dramatically improve the speed of your WordPress site load time.
This plugin will optimize your website’s files, making them smaller and easier for visitors to download. The end result is a faster-loading website that is more stable and performs better when there is a burst of traffic.
What Autoptimize plugin does?
1: Aggregation of files
2: Minification of files
3: Caching of files (Autoptimize works well with WP Super Cache)
4: Defers scripts to the footer
5: Content Delivery Network (CDN) integration
Word of caution
Autoptimize is a very powerful plugin, it’s not for a beginner. If not properly configured it can slow down your website or even break your website. I am not telling you this to scare you, but this is one plugin you should be careful.
Autoptimize has quite a few advanced options, do not enable unless you know what you are doing. What I have suggested here, are the most basic and safe settings for Autoptimize. These settings should work for most WordPress websites.
Having said that, let’s go ahead and install Autoptimize. On the WordPress Dashboard > Go to Plugin > Add new > Search for Autoptimize. Install and activate.
On the admin dashboard, under settings > Autoptimize. This will open the Autoptimize settings page. You just have to enable three things here.
1. Autoptimize CSS Options, check (enable) Optimize CSS code.
Leave the other options as it is.
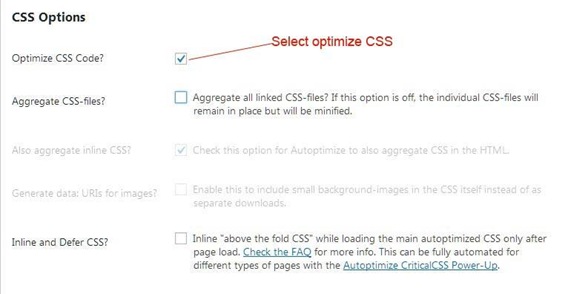
For more advanced settings see our detailed post on How to Inline Critical CSS above-the-fold With Autoptimize
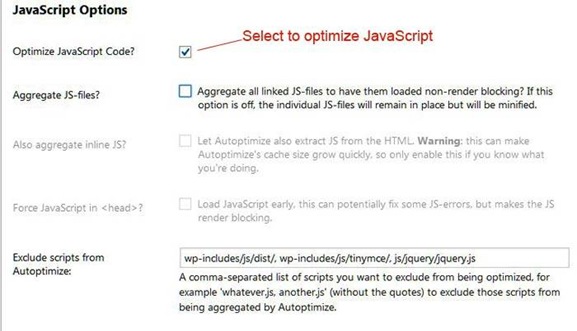
2: Under Javascript Options
::: Select ( enable) Optimize JavaScript code?
Leave the other options as it is.
3::: Under HTML Options
4::: Check ( enable) Optimize HTML Code?
Leave the other options as it is.

4: Under the Misc Options
Check to enable the following
::: Save aggregated script/CSS as static files.
::: Minify excluded CSS and JS files
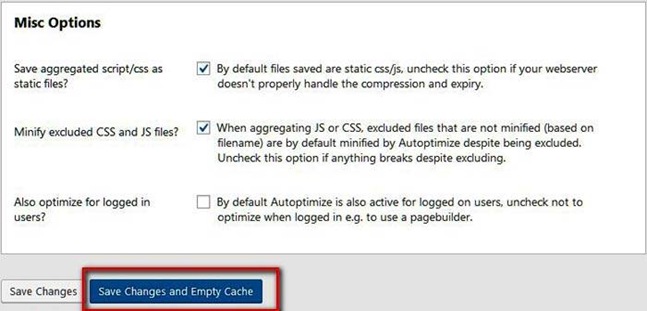
That’s all you have to do in Autoptimize. Now click on the “ Save Changes and Empty Cache” tab and you are done. We have configured Autoptimize.
This is the most basic and simplest and also safest configuration for the Autoptimize plugin.
After testing your site with these settings you can you can go for more advanced settings of the Autoptimize plugin. check out the Best Autoptimize settings for WordPress
3: Async JavaScript WordPress Plugin
The third Plugin is the Async JavaScript WordPress plugin. When you test your website in GTmetrix or Google page speed, you must have seen these warnings like “ Eliminate Render-blocking Javascript in above-the-fold or even more cryptic warnings, such as the one which says “Eliminate render-blocking resources”.
Render-blocking Javascript prevents above-the-fold content on your page from being rendered until the javascript has finished loading.
Async JavaScript gives you full control of which scripts to add an ‘async’ or ‘defer’ attribute to or to exclude. This plugin help increase the performance and must-have plugins to speed up the WordPress website.
This is also a free Plugin. Go ahead and install this plugin as you did for Autoptimize.
After installation, you will find this plugin under > Settings > Async JavaScript. Click on it to get to the settings page.
1: Under Enable Async JavaScript
::: Check to enable: Enable Async JavaScript ( this is to enable the plugin)
::: Check to enable: Also enable Async JavaScript for logged-in users.

::: Under Async JavaScript Method, select the method “Defer”.
Opinion: The “defer” JavaScript method seems to work best in most cases (preferred)
Essentially, by deferring parsing of JavaScript your site tells visitors’ browsers to wait to download and/or parse JavaScript until after your site’s main content has already finished loading.
What exactly happens is that at that point, your site visitors can already see the content and interact with your page. So the wait time to download and parse that JavaScript no longer has a negative effect on your site loading time.
This, in turn, speeds up your content’s above-the-fold load time, this makes search engines happy and creates a better, speedier experience for your visitors.
::: Under jQuery
A lot of themes and plugins rely heavily on jQuery.
If you try to defer parsing the jQuery scripts this might break some of your site’s core functionality. But you can experiment with both syncing or deferring it.
The recommended setting is to “Exclude” jQuery
Select to exclude method. If you have installed the WP Touch plugin to make your site mobile friendly choose “exclude”
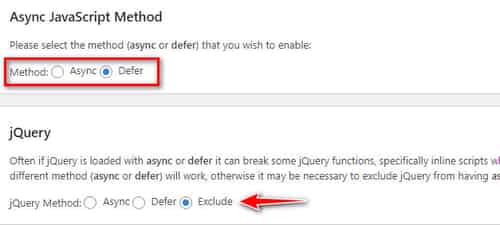
We are almost done, lastly, on the top of the settings page you will find the “Quick Settings“. This is basically one-click settings for all the options we just set. Click on “ Apply Defer (jQuery excluded)”

Now scroll down to the bottom of the settings page.
Check (enable) “Enable Autoptimize Support”.
Autoptimize Javascript Method: Check to enable the “Defer” radio button.
Then click on save settings.

We are done now.
::: Now Delete WP Super cache plugin cache,
::: Delete Autoptimize cache,
::: Delete your browser cache.
::: Wait for 10 to 15 minutes, before testing your website loading speed.
Let the cache be rebuilt. In the meantime, you can check your website performance.
I have tested and found this combination of WordPress plugin as the 3 best free plugins to speed up WordPress site load time.

Hello! I am Ben Jamir, Founder, and Author of this blog Tipsnfreeware. I blog about computer tips & tricks, share tested free Software’s, Networking, WordPress tips, SEO tips. If you like my post /Tips then please like and share it with your friends.

